分支
分支
如果说有什么特性能让git从其它vcs中脱颖而出,那唯一的答案就是git的分支管理,因为它很快,快到分支切换无感,即便是一个非常大的仓库。一般仓库都会有一个主分支用于存放核心代码,当你想要做出一些修改时,不必修改主分支,可以新建一个新分支,在新分支中提交然后将修改合并到主分支,这样的工作流程在大型项目中尤其适用。在git中每一次提交都会包含一个指针,它指向的是该次提交的内容快照,同时也会指向上一次提交。
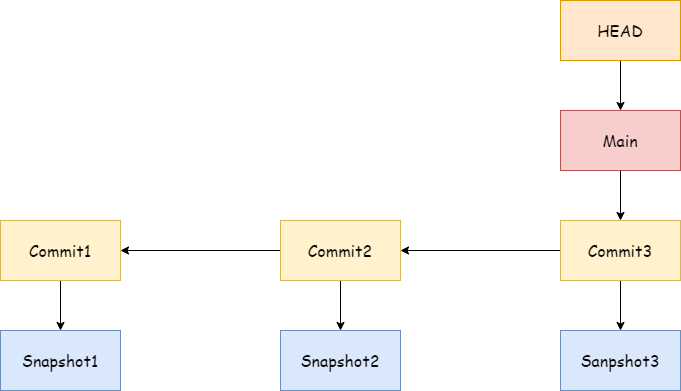
git的分支,实际上正是指向提交对象的可变指针,如图所示。通过如下命令可以看到分支所指向提交的情况
$ git log --oneline --decorate
f5602b9 (HEAD -> main, tag: v1.0.3, tag: v1.0.1, tag: v1.0.0, origin/main) Revert "revert example"
9d3a0a3 revert example
25cdeea a
10e5e5e commit
c7bdcd8 update aaa.txt
e538986 skip stage
b4c2d7f 3rd commit
5ca7961 hello
eff484a initial commit
创建切换
从图中和输出中我们可以看到,HEAD此时是指向main分支,于此同时,main分支与test分支都是指向的f5602b9这一提交,并且还有很多tag,除此之外,还可以看到origin/main这一远程分支。接下来创建一个新的分支试试,通过如下命令可以创建一个分支
$ git branch test
创建完成后,使用git checkout <branchname>来切换到指定分支
$ git switch test
如果想要创建的同时并切换切换成该分支可以使用-b参数,例如
$ git switch -c test
命令git checkout <branchname>也可以切换分支,使用git checkout -b <branchname>也能达到创建并切换的效果,事实上git switch使用的还是git checkout。
提示
git switch命令相对git checkout命令比较新,同时也可能不那么稳定。
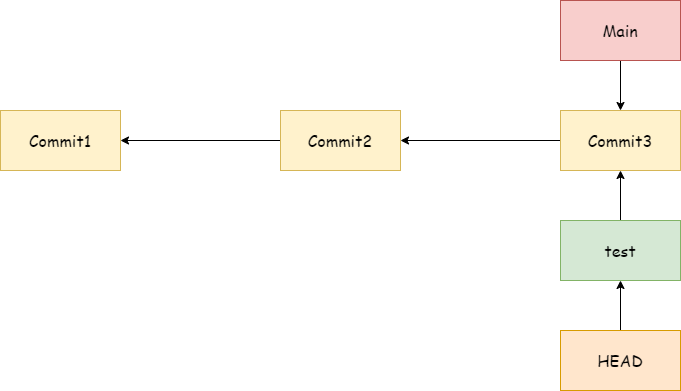
分支切换后,HEAD指针就会指向test分支,HEAD指针永远指向当前所在的分支,通过它就可以知道现在仓库的状态处于哪一个分支。接下来做一个提交来看看。
$ echo "branch test update it" >> hello.txt

$ git commit -a -m "update hello.txt on test branch"
[test 9105078] update hello.txt on test branch
 1 file changed, 1 insertion(+)

$ git log --oneline --decorate
9105078 (HEAD -> test) update hello.txt on test branch
f5602b9 (tag: v1.0.3, tag: v1.0.1, tag: v1.0.0, origin/main, main) Revert "revert example"
9d3a0a3 revert example
25cdeea a
10e5e5e commit
c7bdcd8 update aaa.txt
e538986 skip stage
b4c2d7f 3rd commit
5ca7961 hello
eff484a initial commit
可以从输出中看到,test分支此时指向的是9105078这个提交,而main分支依旧是指向的原来的那个提交。当分支切换回去时,会发现HEAD再次指向了main分支。
$ git switch main
Switched to branch 'main'
Your branch is up to date with 'origin/main'.

$ git log --oneline --decorate
f5602b9 (HEAD -> main, tag: v1.0.3, tag: v1.0.1, tag: v1.0.0, origin/main) Revert "revert example"
9d3a0a3 revert example
25cdeea a
10e5e5e commit
c7bdcd8 update aaa.txt
e538986 skip stage
b4c2d7f 3rd commit
5ca7961 hello
eff484a initial commit
这时再做出一些修改并提交,可以看到HEAD和main分支都指向了最新的提交。
$ echo "update on branch main" >> hello.txt
Stranger@LAPTOP-9VDMJGFL MINGW64 /d/WorkSpace/Code/example (main)
$ git commit -a -m "update on main"
[main d0872e5] update on main
 1 file changed, 1 insertion(+)
$ git log --oneline --decorate
d0872e5 (HEAD -> main) update on main
f5602b9 (tag: v1.0.3, tag: v1.0.1, tag: v1.0.0, origin/main) Revert "revert example"
9d3a0a3 revert example
25cdeea a
10e5e5e commit
c7bdcd8 update aaa.txt
e538986 skip stage
b4c2d7f 3rd commit
5ca7961 hello
再来查看提交日志,git很形象的表示了所有分支的状态。
$ git log --oneline --decorate --graph --all
* d0872e5 (HEAD -> main) update on main
| * 9105078 (test) update hello.txt on test branch
|/
* f5602b9 (tag: v1.0.3, tag: v1.0.1, tag: v1.0.0, origin/main) Revert "revert example"
* 9d3a0a3 revert example
* 25cdeea a
* 10e5e5e commit
* c7bdcd8 update aaa.txt
* e538986 skip stage
* b4c2d7f 3rd commit
* 5ca7961 hello
* eff484a initial commit
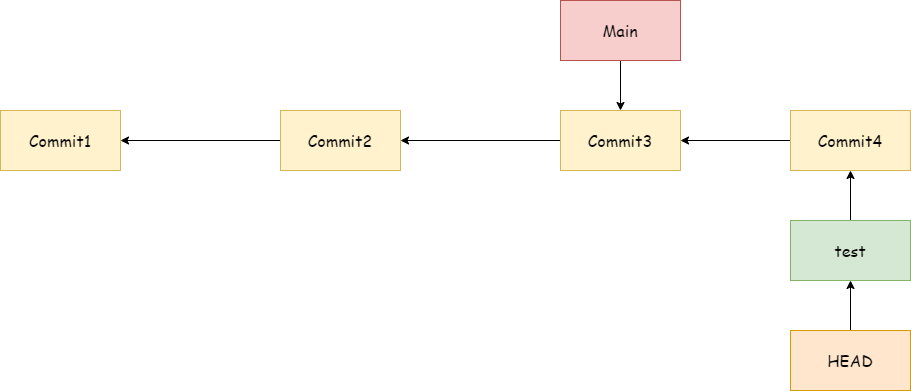
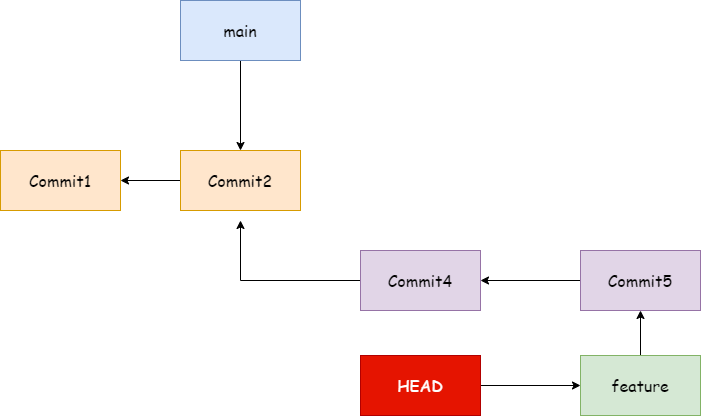
git的输出就如图所示,main与test两个分支最初都指向的同一个提交commit3,在随着有了新的提交后,它们都分别指向了各自不同的提交,当想要切换分支时,git就会将HEAD指针指向指定的分支,并将工作区恢复成该分支所指向提交的状态,在git中,分支的切换仅仅只是指针的移动,所以切换起来相当的迅速。正应如此,开发人员可以随心所欲的创建属于自己的分支来给仓库添加新的特性,这些变更在最后合并分支后都会出现在主分支中。
提示
刚刚提到的主分支,只是对开发人员的一个概念,git中没有什么特殊分支,起名为main仅仅只是将它看待成主分支,实际上它与test分支并没有什么不同,默认的master分支也只是git的一个默认名称而已。
在创建分支时,也可以不必从最新的提交创建,通过如下命令指定提交,就可以从指定的提交创建分支。
$ git branch <branche-name> [commit-id]
$ git log --oneline
0658483 (HEAD -> main, feature_v2) another new feature
28d8277 add new feature
a35c102 clear hello.txt
0224b74 (test, op) initial commit
$ git branch jkl a35c102
$ git log --oneline
0658483 (HEAD -> main, feature_v2) another new feature
28d8277 add new feature
a35c102 (jkl) clear hello.txt
0224b74 (test, op) initial commit
从输出中可以看到,jkl分支指向的是a35c102这一提交。
临时修改
在分支切换时,git会将工作区切换到该分支所指向提交的状态,并且暂存区会被清空,这就意味着,如果在切换分支时有未提交的修改,那么这些修改将会丢失。不过git显然不允许这样的情况发生,它会这样提示你。
$ git switch test
error: Your local changes to the following files would be overwritten by checkout:
        hello.txt
Please commit your changes or stash them before you switch branches.
Aborting
注意
如果你非要这么做,可以加上--discard-changes参数来丢弃修改或者--merge合并修改。
在进行危险操作时git总会提醒你不要这么做,从输出中可以得知,当本地有未提交的修改时,git不允许切换分支,要么把修改提交了,要么就使用一个名为git stash。它可以将本地未提交的修改临时保存起来,待将分支切换回来以后,还可以将这些修改复原,回到之前的状态,以便继续这个分支的开发工作。示例如下
$ echo "123" >> hello.txt
$ git add hello.txt
$ git switch test
error: Your local changes to the following files would be overwritten by checkout:
        hello.txt
Please commit your changes or stash them before you switch branches.
Aborting
$ git stash
Saved working directory and index state WIP on main: d0872e5 update on main
$ git switch test
Switched to branch 'test'
这里先做了一些修改,将修改添加到了暂存区但未提交,只要是被追踪的文件发生变化,这里不添加到暂存区一样会被阻止,如果不添加到暂存区,git在stash时会自动添加将修改添加到暂存区。可以看到在切换分支时被git阻止了,于是使用git stash命令将这些修改临时存放后成功切换到了test分支。然后再切换回来,使用git stash pop来恢复最近一个临时保存的修改。
$ git switch main
Switched to branch 'main'
Your branch is ahead of 'origin/main' by 1 commit.
  (use "git push" to publish your local commits)

$ git stash pop
On branch main
Changes not staged for commit:
  (use "git add <file>..." to update what will be committed)
  (use "git restore <file>..." to discard changes in working directory)
        modified:   hello.txt

no changes added to commit (use "git add" and/or "git commit -a")
Dropped refs/stash@{0} (f4a0c807addcd08959555e02d4191fb5324dad88)
可以看到仓库状态又变成了未暂存的修改,一旦临时修改被恢复过后,它就会被移出,正如pop所表达的含义一样。我们可以进行多次临时保存,并选择特定的修改来恢复。这里分别进行两次修改,然后临时保存两次。
$ echo "123" >> hello.txt
$ git stash
Saved working directory and index state WIP on test: 0224b74 initial commit
$ echo "12345" >> hello.txt
$ git stash
Saved working directory and index state WIP on test: 0224b74 initial commit
$ git stash show
 hello.txt | 1 +
 1 file changed, 1 insertion(+)
$ git stash list
stash@{0}: WIP on test: 0224b74 initial commit
stash@{1}: WIP on test: 0224b74 initial commit
通过输出可以发现有两个临时保存的修改,存放的顺序就跟栈一样,后进先出,最上面的就是最新的修改。这时可以使用命令git stash apply来恢复指定的修改。
$ git stash apply stash@P{index}
如果恢复完成过后,想要删除的话,使用如下命令
$ git stash drop stash@P{index}
git stash pop就是将最近的一次修改恢复并删除。也可以使用clear命令来一次性删除所有的修改
$ git stash clear
在上面的输出中可以看到,stash输出的修改列表除了索引不一样,其它都没什么区别,这样很难区分到底做了什么修改。为此,可以加上-m参数。
$ echo "456" >> hello.txt
$ git stash push -m "456"
Saved working directory and index state On test: 456
$ git stash list
stash@{0}: On test: 456
$ echo "789" >> hello.txt
$ git stash -m "789"
Saved working directory and index state On test: 789
$ git stash list
stash@{0}: On test: 789
stash@{1}: On test: 456
从输出中可以看到,当git stash不带子命令直接执行时,其实就是执行的git stash push,加上-m参数以后,查看修改历史就可以看到我们自定义的信息了。
合并删除
git支持多分支开发,也非常鼓励多分支开发。一般而言,一个项目会有一个主分支,也是就是main或master(只是一个名字而已,叫什么不重要),主分支的代码是最稳定的,通常软件发版就是在主分支发行。当你后期想要添加一个新特性,或者修复一个问题,你可以直接修改主分支代码,但这就破坏了主分支的稳定性,为此可以新建一个分支来做这类工作,新分支的代码可能不那么稳定,开发人员通常会在新分支上捣鼓各种奇奇怪怪的东西,等到稳定后就可以将修改合并到主分支上,又或者是放弃此前的工作,直接删除该分支。所以,在git中你可以随意的新建和删除分支并且不需要什么成本。
下面会做一些例子来进行演示,首先先看看仓库中有哪些分支
$$ git branch -l
* main
  op
  test
可以看到,总共有三个分支,git用* 标注了当前所在的分支,为了方便演示先将hello.txt文件清空并提交。
$ echo "" > hello.txt
$ git commit -a -m "clear hello.txt"
[main a35c102] clear hello.txt
 1 file changed, 1 insertion(+), 17 deletions(-)
随后再新建一个feature分支并切换过去。这里之所以叫feature是表示新增特性,你也可以取其它名字,比如hotfix,即热修复,或者patch,表示补丁,这些名字并不是强制要求的,仅仅只是一个规范,你可以取你想要的任何名字。
$ git checkout -b feature
Switched to a new branch 'feature'
$ git log --oneline
a35c102 (HEAD -> feature, main) clear hello.txt
0224b74 (test, op) initial commit
可以看到四个分支中,test与op分支指向的0224b74提交,而feature与main分支都指向的是最新的提交。接下来在feature分支做一些修改并提交。
$ echo "this is a new feature" >> hello.txt
$ git commit -a -m "add new feature"
[feature 28d8277] add new feature
 1 file changed, 1 insertion(+)
$ echo "this is another new feature" >> hello.txt
$ git commit -a -m "another new feature"
[feature 0658483] another new feature
 1 file changed, 1 insertion(+)
 $ git log --oneline
0658483 (HEAD -> feature) another new feature
28d8277 add new feature
a35c102 (main) clear hello.txt
0224b74 (test, op) initial commit
可以看到feature分支已经领先main两个提交了,前面提到过未提交的修改在切换分支后会丢失,这里将修改提交后切换分支就没什么问题了。这个时候想要合并分支的话,由于我们将main分支作为主分支,所以需要先切回到main分支,git会将当前所作的分支作为被并入的分支,然后再使用git merge命令合并。
$ git checkout main
Switched to branch 'main'

$ git merge feature
Updating a35c102..0658483
Fast-forward
 hello.txt | 2 ++
 1 file changed, 2 insertions(+)
$ cat hello.txt

this is a new feature
this is another new feature
$ git log --oneline
0658483 (HEAD -> main, feature) another new feature
28d8277 add new feature
a35c102 clear hello.txt
0224b74 (test, op) initial commit
合并成功后,查看hello.txt文件就可以看到新的变化了。当一个分支成功合并以后,这个分支就没用了,所以可以将其删除。
$ git branch -d feature
Deleted branch feature (was 0658483).

$ git branch -l
* main
  op
  test
删除后再次查看分支列表,就会发现不存在了,此时main分支的代码就已经是最新的了。
恢复分支
在进行日常操作时,总会不可避免将分支误删除,之前讲到过分支其实就是一个指向提交的指针,而删除分支只是删除这个指针,至于那些提交不会有任何变化,所以恢复的关键点在于找到提交。在先前的例子中,我们已经将feature分支删除了,为了恢复该分支,我们先看看git的引用日志。
$ git reflog
0658483 (HEAD -> main) HEAD@{0}: merge feature: Fast-forward
a35c102 HEAD@{1}: checkout: moving from feature to main
0658483 (HEAD -> main) HEAD@{2}: checkout: moving from main to feature
a35c102 HEAD@{3}: checkout: moving from main to main
a35c102 HEAD@{4}: checkout: moving from feature to main
0658483 (HEAD -> main) HEAD@{5}: checkout: moving from main to feature
a35c102 HEAD@{6}: checkout: moving from feature to main
0658483 (HEAD -> main) HEAD@{7}: commit: another new feature
28d8277 HEAD@{8}: commit: add new feature
a35c102 HEAD@{9}: checkout: moving from main to feature
a35c102 HEAD@{10}: commit: clear hello.txt
0224b74 (test, op) HEAD@{11}: checkout: moving from test to main
0224b74 (test, op) HEAD@{12}: reset: moving to HEAD
0224b74 (test, op) HEAD@{13}: reset: moving to HEAD
0224b74 (test, op) HEAD@{14}: reset: moving to HEAD
0224b74 (test, op) HEAD@{15}: reset: moving to HEAD
0224b74 (test, op) HEAD@{16}: checkout: moving from op to test
0224b74 (test, op) HEAD@{17}: checkout: moving from main to op
0224b74 (test, op) HEAD@{18}: checkout: moving from test to main
0224b74 (test, op) HEAD@{19}: reset: moving to HEAD
0224b74 (test, op) HEAD@{20}: commit (initial): initial commit
关键点在于这一条,这时我们在feature分支做的最后一个提交
0658483 (HEAD -> main) HEAD@{7}: commit: another new feature
使用该commitId创建一个新分支
$ git checkout -b feature_v2 0658483
Switched to a new branch 'feature_v2'
$ git log --oneline
0658483 (HEAD -> feature_v2, main) another new feature
28d8277 add new feature
a35c102 clear hello.txt
0224b74 (test, op) initial commit
从输出中可以看到,在先前feature分支的提交都已经恢复了。
冲突解决
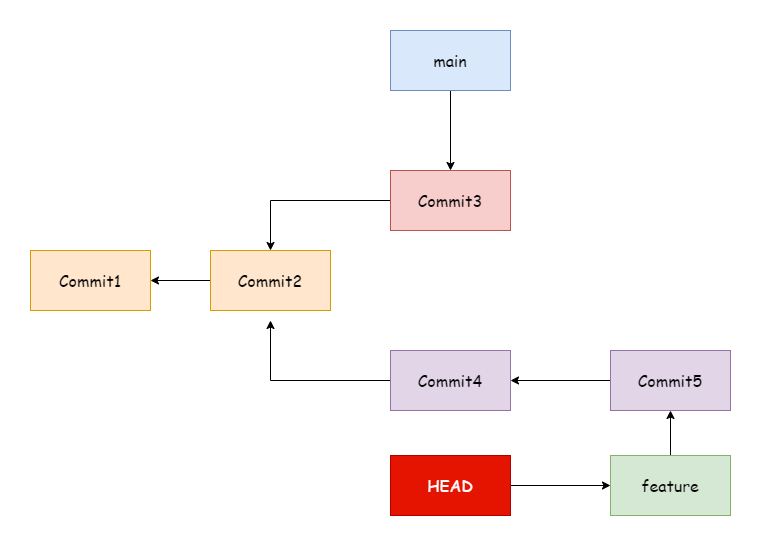
上述过程就是一个多分支开发的例子,这个简单的案例中只涉及到了一个文件的变化,在使用的过程中很难会出什么问题。不过在实际项目中从主分支中创建一个新分支,主分支在合并前就可能有了很多的新的提交,这些提交可能是从其它分支中合并来的,新的提交可能会涉及到很多文件的新增,修改,删除,而新分支也是同样如此,这样一来在合并时就不可避免的会出现冲突,只有将冲突解决后,才能成功合并。如图所示
为了演示冲突,先在从当前提交创建一个新分支,并做一些修改。
$ git checkout -b conflict
Switched to a new branch 'conflict'

$ echo "this is update at conflict branch" >> hello.txt

$ git commit -a -m "update hello.txt"
[conflict 2ae76e4] update hello.txt
 1 file changed, 1 insertion(+)
然后切回main分支,再做一个修改并提交。
$ git checkout main
Switched to branch 'main'

$ echo "this is a update at main branch" >> hello.txt

$ git commit -a -m "update hello.txt"
[main fd66aec] update hello.txt
 1 file changed, 1 insertion(+)
此时查看提交历史,就跟上图描述的差不多
$ git log --graph --all --oneline
* fd66aec (HEAD -> main) update hello.txt
| * 2ae76e4 (conflict) update hello.txt
|/
* 0658483 (feature_v2) another new feature
* 28d8277 add new feature
* a35c102 (jkl) clear hello.txt
| * 67f67ee (refs/stash) On test: 789
|/|
| * 8a311a3 index on test: 0224b74 initial commit
|/
* 0224b74 (test, op) initial commit
现在开始准备合并,git会提示你没法合并,因为有文件冲突,只有将冲突解决了才能合并。
$ git merge conflict
Auto-merging hello.txt
CONFLICT (content): Merge conflict in hello.txt
Automatic merge failed; fix conflicts and then commit the result.
$ git status
On branch main
You have unmerged paths.
  (fix conflicts and run "git commit")
  (use "git merge --abort" to abort the merge)

Unmerged paths:
  (use "git add <file>..." to mark resolution)
        both modified:   hello.txt

no changes added to commit (use "git add" and/or "git commit -a")
这时看看hello.txt文件
$ cat hello.txt

this is a new feature
this is another new feature
<<<<<<< HEAD
this is a update at main branch
=======
this is update at conflict branch
>>>>>>> conflict
会发现git已经给你标记好了哪些修改是main分支做的,哪些修改conflict分支做的,由于同时修改了同一个文件,所以产生了冲突。我们使用vim将文件修改成如下内容。
this is a new feature
this is another new feature
this is a update at main branch
this is update at conflict branch
实际上只是去掉了git后面加的标记,因为这两个分支的修改我们都需要保留,只有将git冲突标记去掉后,git才会认为是真正解决了冲突,然后再将修改提交。
$ git commit -a -m "merged from conflict"
[main 388811a] merged from conflict
$ git log --oneline --graph --all
*   388811a (HEAD -> main) merged from conflict
|\
| * 2ae76e4 (conflict) update hello.txt
* | fd66aec update hello.txt
|/
* 0658483 (feature_v2) another new feature
* 28d8277 add new feature
* a35c102 (jkl) clear hello.txt
| * 67f67ee (refs/stash) On test: 789
|/|
| * 8a311a3 index on test: 0224b74 initial commit
|/
* 0224b74 (test, op) initial commit
main分支和conflict分支最初的父提交都是0658483 ,而后两个分支分别做各自的修改,它们的最新提交分别是fd66aec和2ae76e4。这样一来,git在合并时就会比对这三个提交所对应的快照,进行一个三方合并。而在之前的feature分支中,由于main分支并未做出任何新的提交,所以合并后提交历史依旧是线性的,也就不需要三方合并。从提交历史中可以看到,此时两个分支的提交已经被合并了,而且还多了一个新的提交,这个提交被称为合并提交,它用来记录一次三方合并操作,这样一来合并操作就会被记录到提交历史中,合并后的仓库提交历史如图所示。
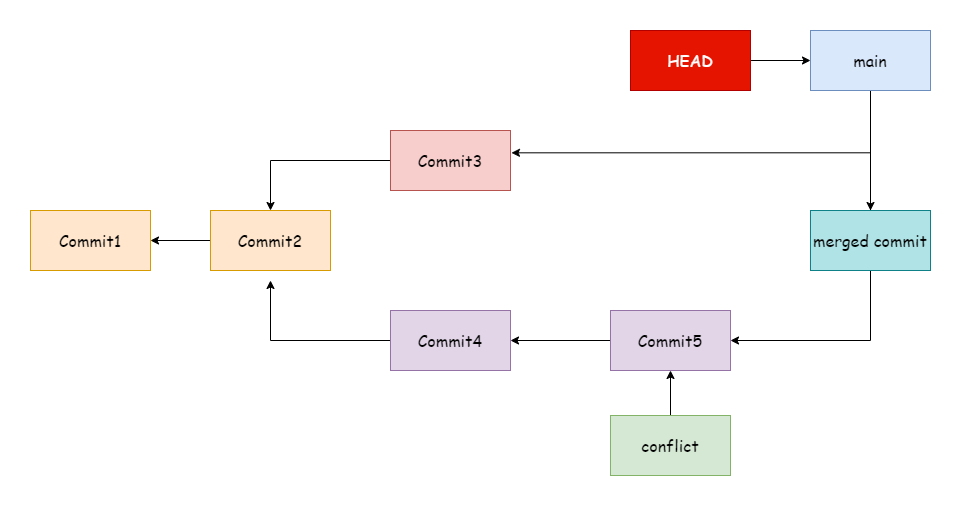
在提交历史中可以清晰的看到,这是一次合并提交
commit 388811a9465176c7dadfa75f06c41c7f66cb88a2
Merge: fd66aec 2ae76e4
Author: 246859 <2633565580@qq.com>
Date:   Sat Sep 9 10:24:07 2023 +0800

    merged from conflict
Merge: fd66aec 2ae76e4这一行描述了合并前两个分支所指向的最新的提交,通过这两个commitid,也可以很轻松的恢复原分支。
变基操作
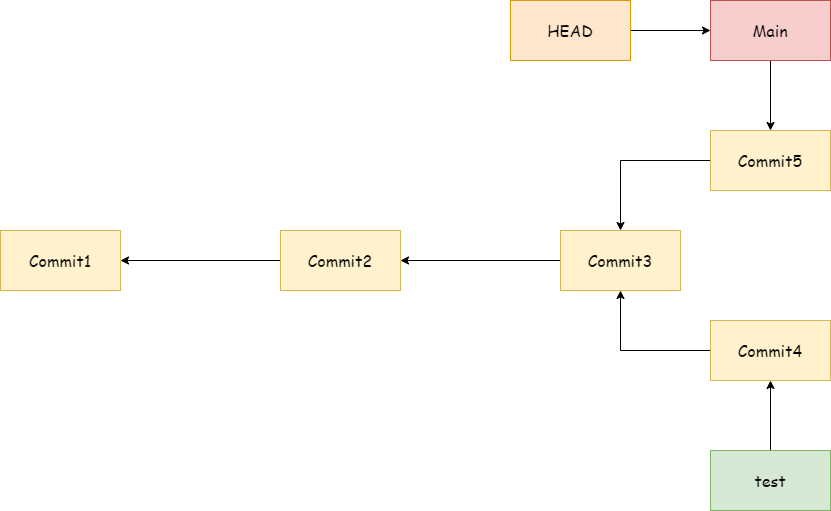
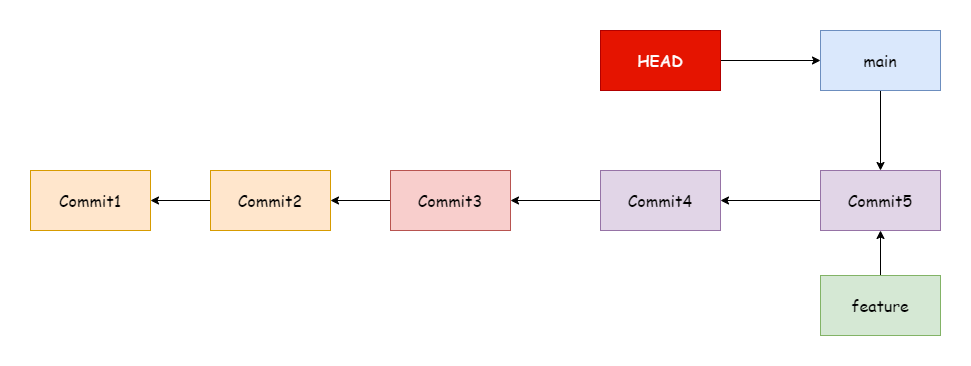
在git中整合不同分支的方法除了合并merge之外,还有一个方法就是变基rebase。在之前的例子中,我们可以得知,合并操作会将对两个分支进行三方合并,最终结果是生成了一个新的提交,并且这个提交在历史中会被记录。而变基则相反,它不会生成一个新的提交,对于上图这种状态,它会将feature分支上所有的修改都移到main分支上,原本feature分支是从Commit2的基础之上新建来的,执行rebase操作后,feature分支中的Commit4将会指向Commit3,这一过程就被称作变基,就如下图所示。然后就只需要一个普通合并让main分支指向Commit5就完成操作了。

双分支
下面会例子来进行演示,首先在main分支对README.md文件做修改并提交。
$ echo "123" >> README.md

$ git commit -a -m "update README"
[main 0d096d1] update README
 1 file changed, 1 insertion(+)
然后在前一个提交的基础上新建一个名为feature_v3的分支,在该分支上对hello.txt进行修改并提交
$ git branch feature_V3 388811a

$ git switch feature_V3
Switched to branch 'feature_V3'

$ echo "456" >> hello.txt

$ git commit -a -m "update hello.txt"
[feature_V3 63f5bc8] update hello.txt
 1 file changed, 1 insertion(+)
此时仓库状态跟下面的输出一样,是分叉的。
$ git log --oneline --all --graph
* 63f5bc8 (HEAD -> feature_V3) update hello.txt
| * 0d096d1 (main) update README
|/
*   388811a merged from conflict
|\
| * 2ae76e4 (conflict) update hello.txt
* | fd66aec update hello.txt
|/
* 0658483 (feature_v2) another new feature
* 28d8277 add new feature
* a35c102 (jkl) clear hello.txt
| * 67f67ee (refs/stash) On test: 789
|/|
| * 8a311a3 index on test: 0224b74 initial commit
|/
* 0224b74 (test, op) initial commit
在feature_v3分支上对main分支执行变基操作,就会发现提交历史又变成线性的了,提交63f5bc8原本指向的父提交从388811a变成了main分支的 0d096d1。
$ git rebase main
Successfully rebased and updated refs/heads/feature_V3.

$ git log --oneline --graph
* a7c0c56 (HEAD -> feature_V3) update hello.txt
* 0d096d1 (main) update README
*   388811a merged from conflict
|\
| * 2ae76e4 (conflict) update hello.txt
* | fd66aec update hello.txt
|/
* 0658483 (feature_v2) another new feature
* 28d8277 add new feature
* a35c102 (jkl) clear hello.txt
* 0224b74 (test, op) initial commit
然后再切回main分支,对feature_v3进行合并。这种合并就不是三方合并了,只是让main分支指针移动到与feautre_v3分支所指向的同一个提交,所以也不会生成新的合并提交,这种合并被称为快进合并。
$ git merge feature_v3
Updating 0d096d1..a7c0c56
Fast-forward
 hello.txt | 1 +
 1 file changed, 1 insertion(+)

$ git log --oneline --all --graph
* a7c0c56 (HEAD -> main, feature_V3) update hello.txt
* 0d096d1 update README
*   388811a merged from conflict
|\
| * 2ae76e4 (conflict) update hello.txt
* | fd66aec update hello.txt
|/
* 0658483 (feature_v2) another new feature
* 28d8277 add new feature
* a35c102 (jkl) clear hello.txt
| * 67f67ee (refs/stash) On test: 789
|/|
| * 8a311a3 index on test: 0224b74 initial commit
|/
* 0224b74 (test, op) initial commit
此时仓库状态就类似下图。变基与三方合并结果并没有区别,只是变基操作不会被记录在提交历史中,且提交历史看起来是线性的,能够保持提交历史的简介。
三分支
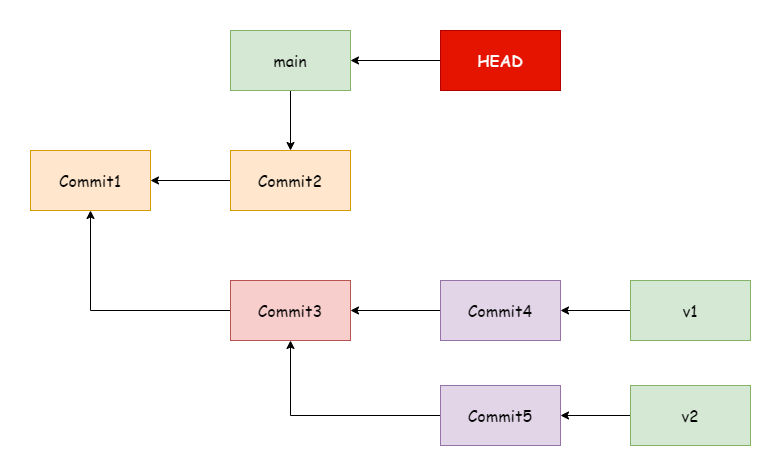
似乎从目前看来,变基要比合并好用的多,不过事实并非如此。下面来演示三个分支变基的例子。先创建一个新分支叫v1,然后在main分支上做一些修改并提交,切换到v1分支上做一些修改并提交,在这个提交的基础上再建一个新分支v2,随后又在v2分支上做一些新提交,总共三个分支。
$ git branch v1
$ echo "123" >> hello.txt
$ git commit -a -m "update hello.txt"
[main e2344ae] update hello.txt
 1 file changed, 1 insertion(+)
$ git checkout v1
Switched to branch 'v1'
$ echo "456" >> README.md
$ git commit -a -m "update README"
[v1 22131f9] update README
 1 file changed, 1 insertion(+)
$ echo "789" >> README.md
$ git commit -a -m "update README again"
[v1 06983cb] update README again
 1 file changed, 1 insertion(+)
$ git checkout v2
Switched to branch 'v2'
$ echo "good bye!" >> bye.txt
$ git add bye.txt && git commit -a -m "add new bye.txt"
[v2 2b14346] add new bye.txt
 1 file changed, 1 insertion(+)
 create mode 100644 bye.txt
经过一系列修改后,就有了三个分支,并且各自都有新提交,此时仓库提交历史如下
$ git log --graph --oneline --all
* 2b14346 (HEAD -> v2) add new bye.txt
| * 06983cb (v1) update README again
|/
* 22131f9 update README
| * e2344ae (main) update hello.txt
|/
* a7c0c56 (feature_V3) update hello.txt
* 0d096d1 update README
*   388811a merged from conflict
|\
| * 2ae76e4 (conflict) update hello.txt
* | fd66aec update hello.txt
|/
* 0658483 (feature_v2) another new feature
* 28d8277 add new feature
* a35c102 (jkl) clear hello.txt
| * 67f67ee (refs/stash) On test: 789
|/|
| * 8a311a3 index on test: 0224b74 initial commit
|/
* 0224b74 (test, op) initial commit
类似下图所描述的结构
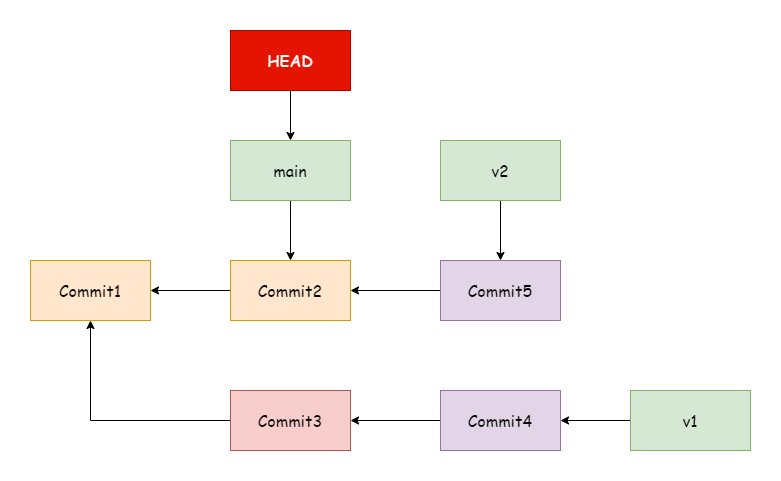
假如我想要把v2分支的修改合并到main分支中,因为v2分支的修改已经工作完毕,可以考虑合并了,但v1分支中的修改还不稳定,需要继续完善,所以只想要应用v2的修改,但并不想应用v1的修改,这就需要用到git rebase --onto。
$ git rebase --onto main v1 v2
Successfully rebased and updated refs/heads/v2.
通过执行上述命令,git会将v2分支变基到main分支上,git会找出v2分支从v1分支分离后的修改,将其应用在main分支上。--onto参数就是干这活的,如果直接进行变基的话,v1和v2的修改都会被应用到main分支上。
$ git log --oneline --all --graph
* 9991f25 (HEAD -> v2) add new bye.txt
* e2344ae (main) update hello.txt
| * 06983cb (v1) update README again
| * 22131f9 update README
|/
* a7c0c56 (feature_V3) update hello.txt
* 0d096d1 update README
*   388811a merged from conflict
|\
| * 2ae76e4 (conflict) update hello.txt
* | fd66aec update hello.txt
|/
* 0658483 (feature_v2) another new feature
* 28d8277 add new feature
* a35c102 (jkl) clear hello.txt
| * 67f67ee (refs/stash) On test: 789
|/|
| * 8a311a3 index on test: 0224b74 initial commit
|/
* 0224b74 (test, op) initial commit
通过提交历史可以看到,此时的提交历史如下图所示
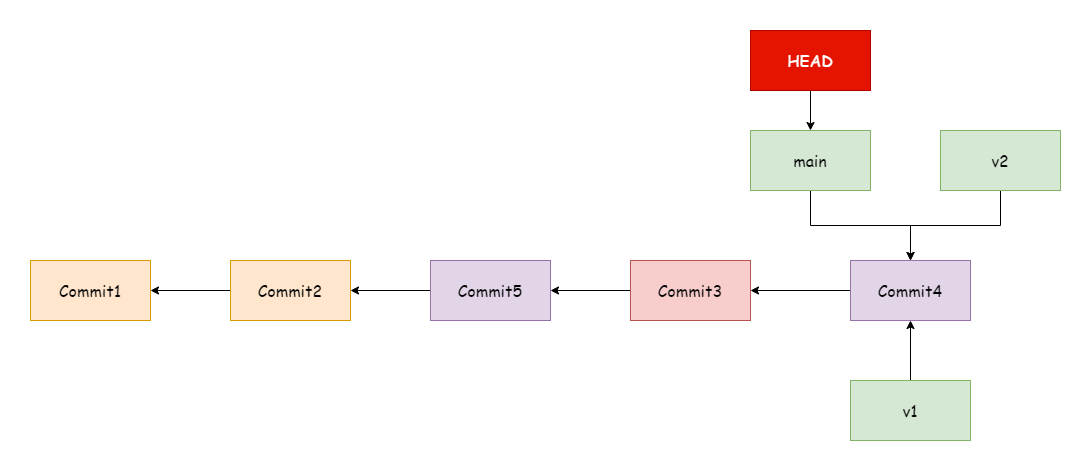
先别急着合并,在这之前,先将分支v1变基到v2分支上
$ git rebase v2 v1
Successfully rebased and updated refs/heads/v1.

$ git log --oneline --all --graph
* ead7b89 (HEAD -> v1) update README again
* 7b3ec3a update README
* 9991f25 (v2) add new bye.txt
* e2344ae (main) update hello.txt
* a7c0c56 (feature_V3) update hello.txt
* 0d096d1 update README
*   388811a merged from conflict
|\
| * 2ae76e4 (conflict) update hello.txt
* | fd66aec update hello.txt
|/
* 0658483 (feature_v2) another new feature
* 28d8277 add new feature
* a35c102 (jkl) clear hello.txt
| * 67f67ee (refs/stash) On test: 789
|/|
| * 8a311a3 index on test: 0224b74 initial commit
|/
* 0224b74 (test, op) initial commit
通过提交历史可以看到,此时的提交历史又变成线性的了,然后再逐一合并
$ git switch v2
Switched to branch 'v2'

$ git merge v1
Updating 9991f25..ead7b89
Fast-forward
 README.md | 2 ++
 1 file changed, 2 insertions(+)

$ git switch main
Switched to branch 'main'

$ git merge v1
Updating e2344ae..ead7b89
Fast-forward
 README.md | 2 ++
 bye.txt   | 1 +
 2 files changed, 3 insertions(+)
 create mode 100644 bye.txt

$ git log --oneline --graph --all
* ead7b89 (HEAD -> main, v2, v1) update README again
* 7b3ec3a update README
* 9991f25 add new bye.txt
* e2344ae update hello.txt
* a7c0c56 (feature_V3) update hello.txt
* 0d096d1 update README
*   388811a merged from conflict
|\
| * 2ae76e4 (conflict) update hello.txt
* | fd66aec update hello.txt
|/
* 0658483 (feature_v2) another new feature
* 28d8277 add new feature
* a35c102 (jkl) clear hello.txt
| * 67f67ee (refs/stash) On test: 789
|/|
| * 8a311a3 index on test: 0224b74 initial commit
|/
* 0224b74 (test, op) initial commit
这样一来,所有分支的提交都变成线性的了,就如下图所示。这个例子演示了如何在变基时,选择性的合并修改,即便是四个分支,五分支也是同样如此。
缺点
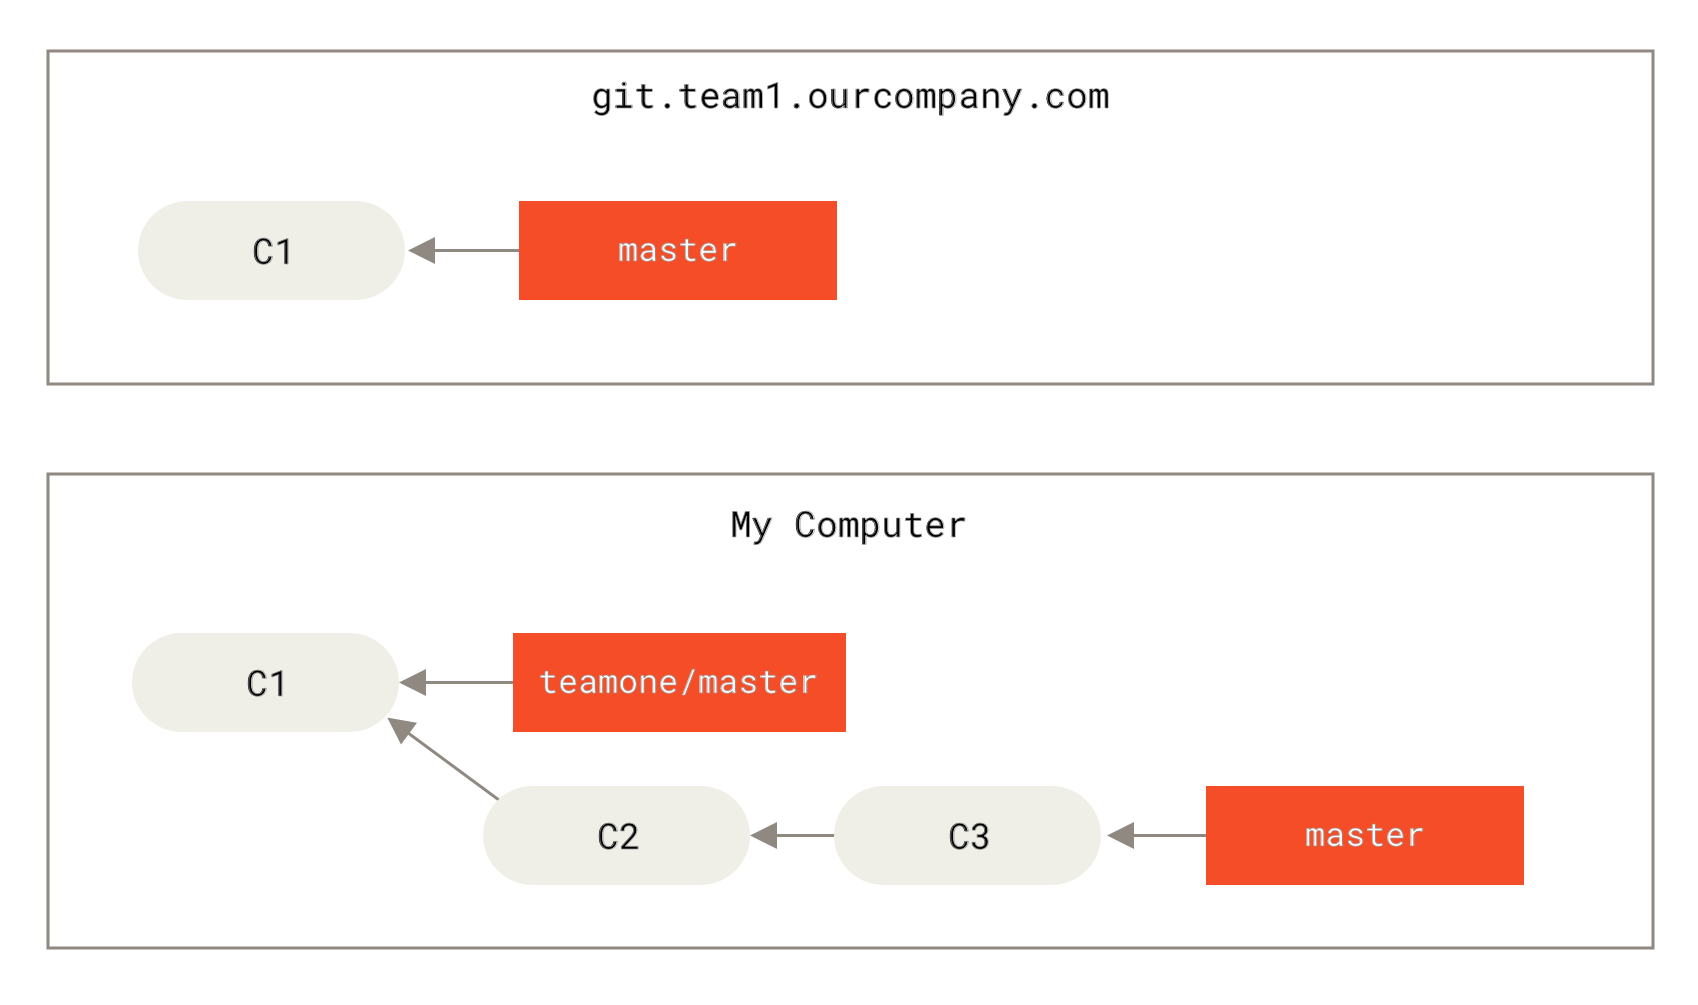
就目前而言的话,变基的使用还是相当愉快的,不过愉快的前提是这个仓库只有你一个人用。变基最大的缺点就是体现在远程仓库中多人开发的时候,下面来讲一讲它的缺点。变基的实质是丢弃一些现有的提交,然后再新建一些看起来一样但其实并不一样的提交,这里拿官网的例子举例Git - 变基 (git-scm.com),可以先去了解下远程仓库再来看这个例子。
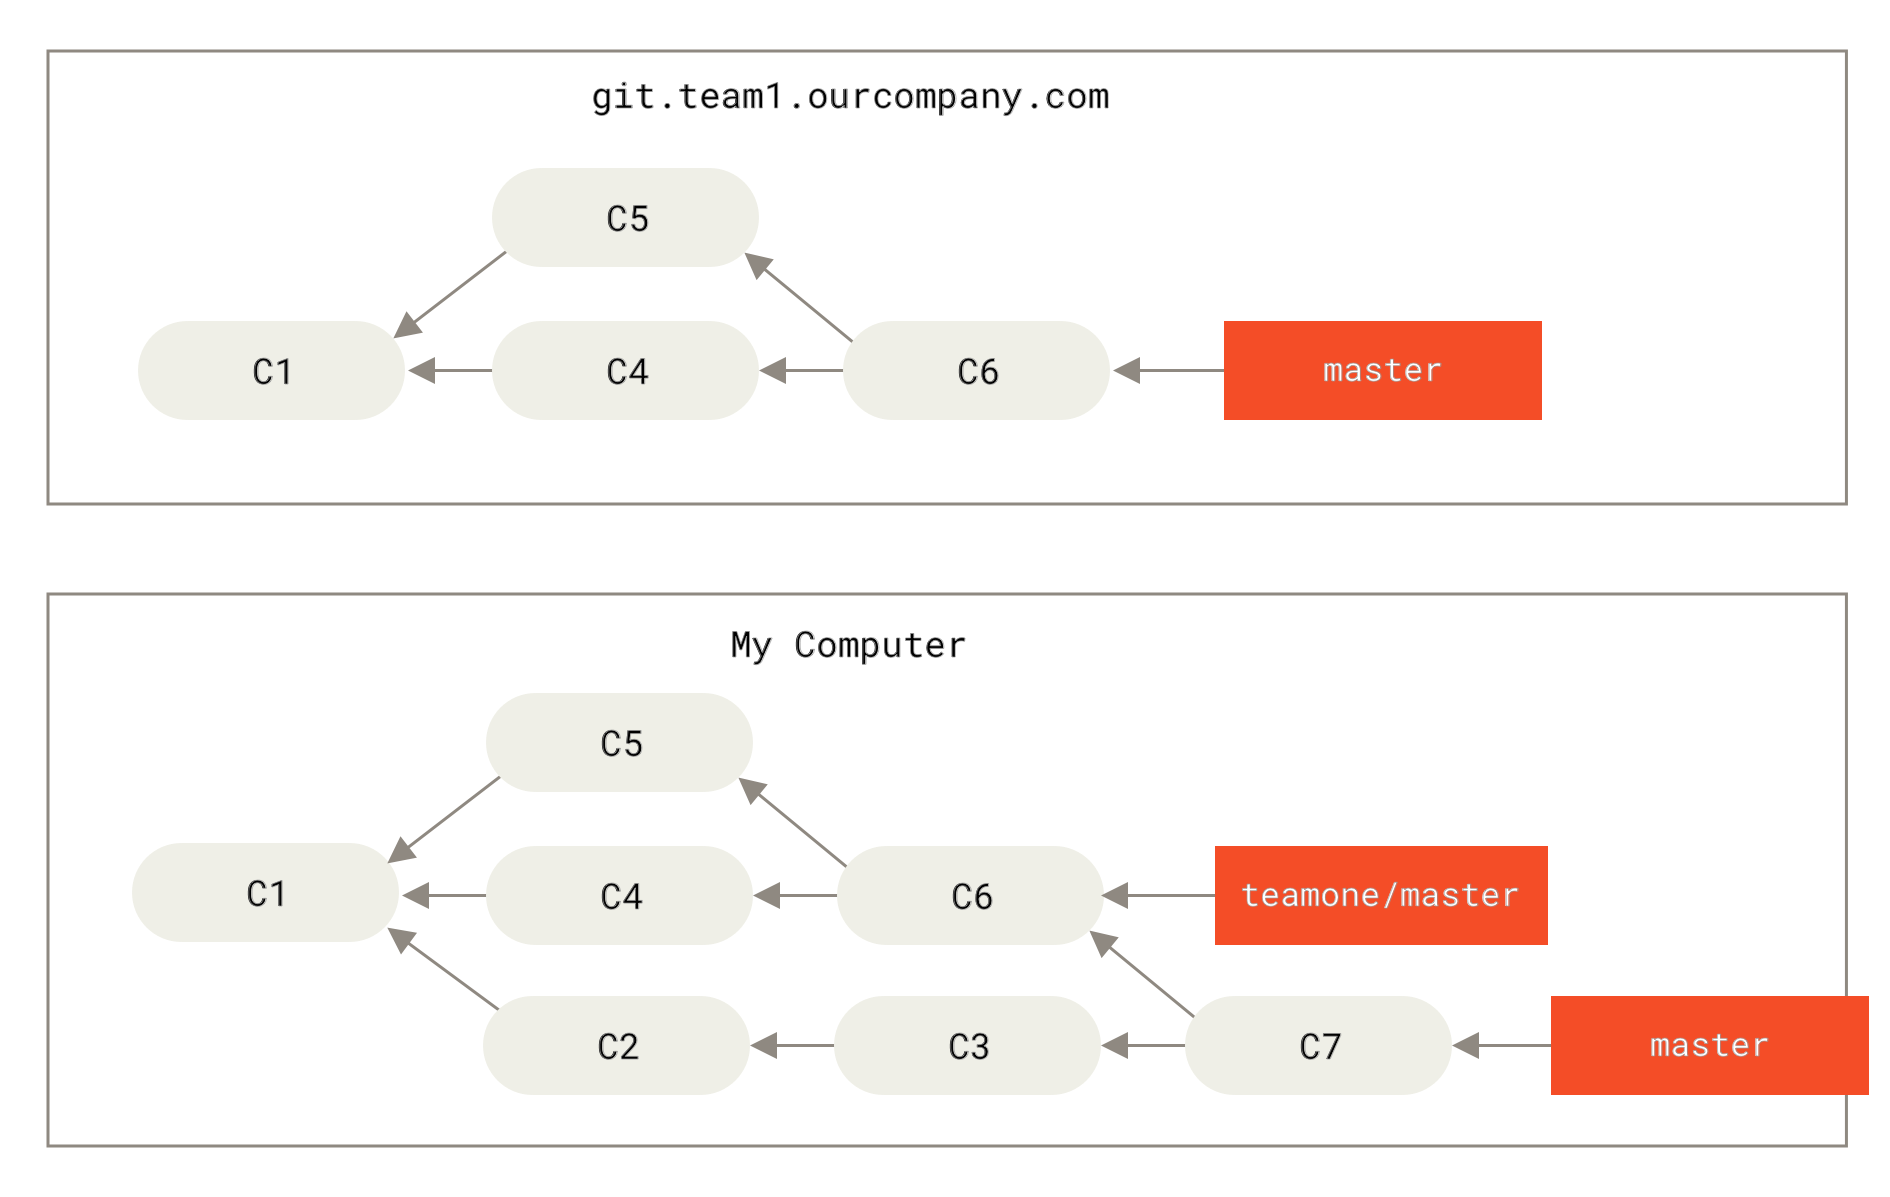
图中分为远程仓库和本地仓库,你的本地仓库在远程仓库的基础之上做了一些修改。
然后另外一个人做了一些合并修改,并推送到远程仓库,随后你又拉取了这些修改到你的本地仓库,并将修改合并到你本地的分支,此时提交历史是这样的。
结果那个人吃饱了撑的又把合并操作撤销了,改用变基操作,然后又用git push --force覆盖了远程仓库上的提交历史。这时如果你再次拉取远程仓库上的修改,你就会发现本地仓库中多出来一些提交,这些多出来的提交,就是变基操作在目标分支上复原的提交。此时的提交历史如下图所示
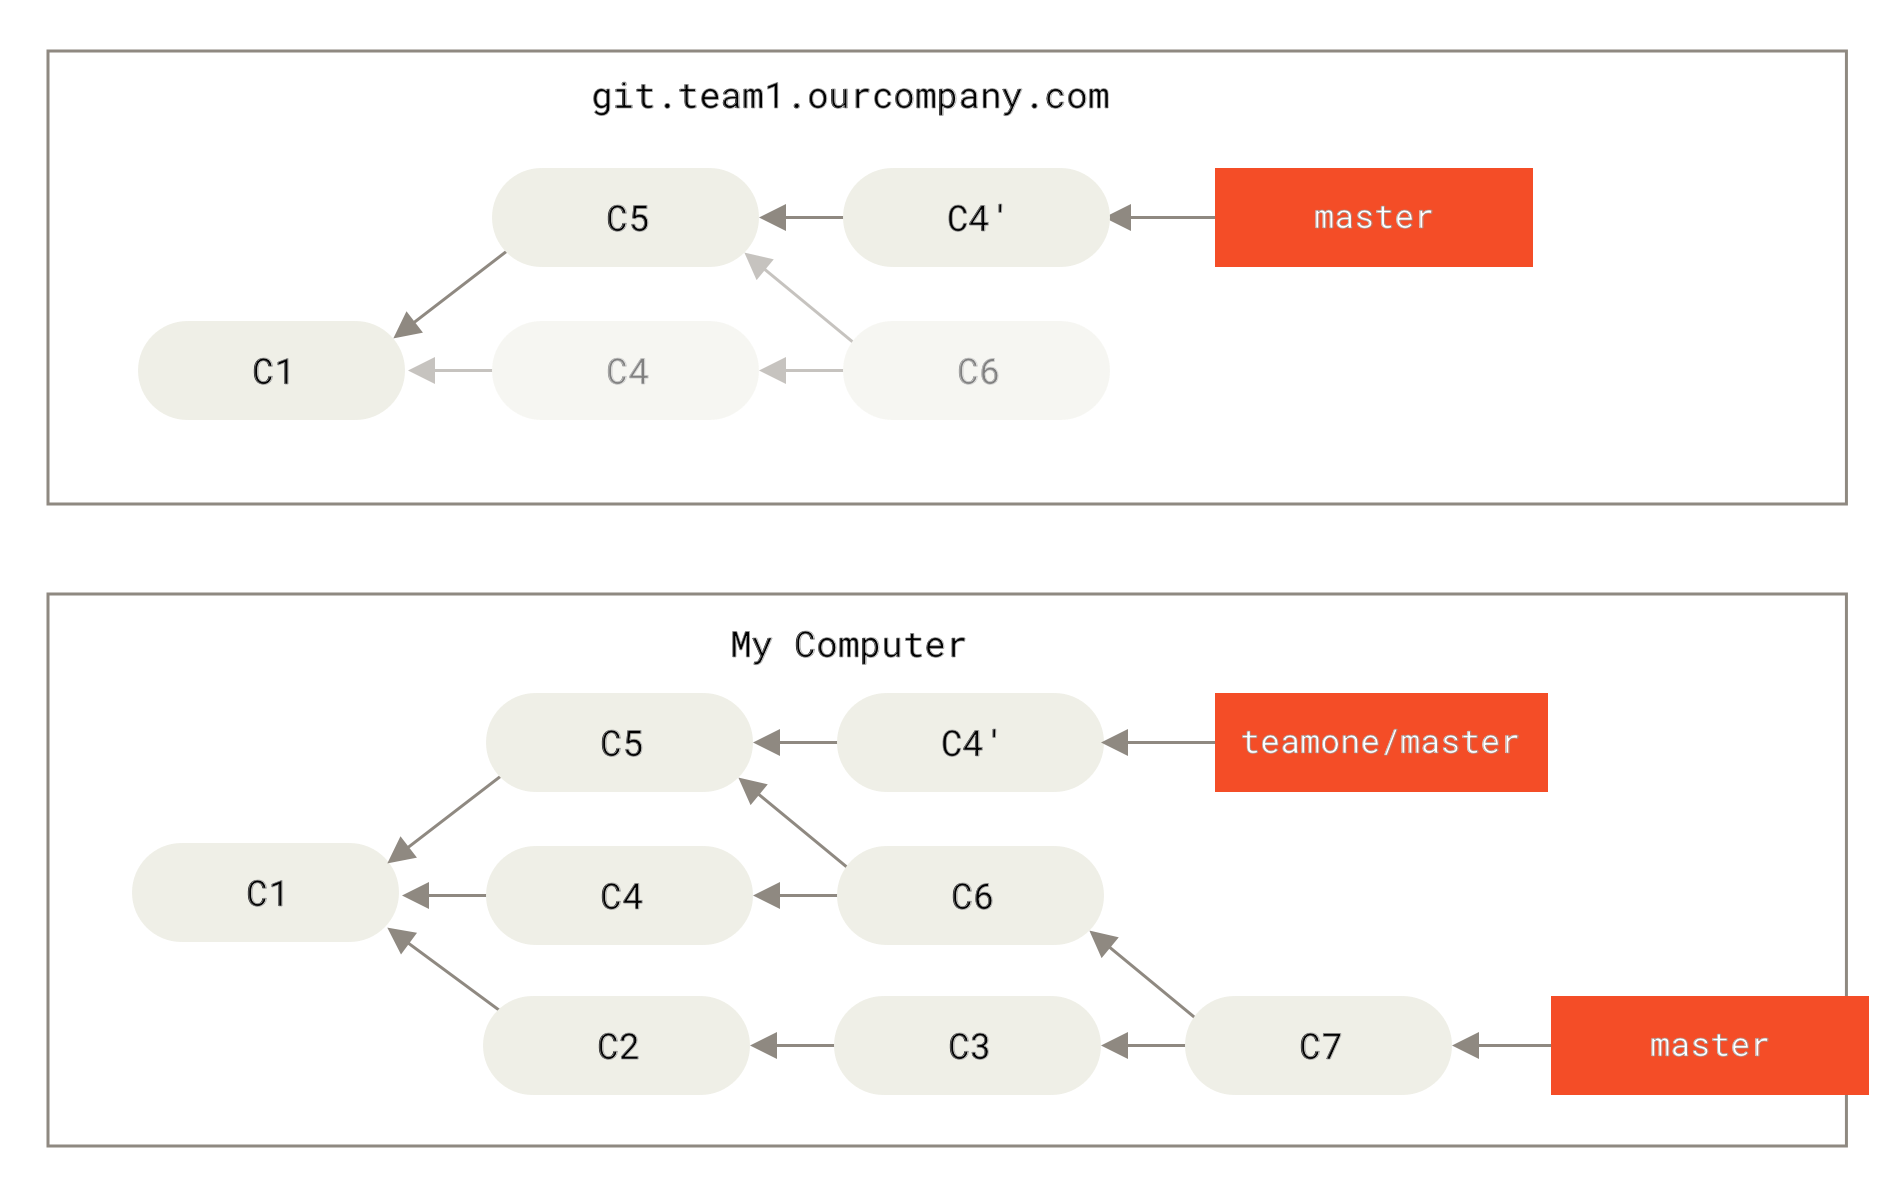
可以看到c6是原来远程仓库中三方合并c1,c4,c5产生的新提交,但是那个人将合并撤销后改用变基,这就意味着c6提交在远程仓库中被废弃了,不过在你的本地仓库并没有废弃,而且你本地仓库的c7提交是从c6提交合并而来的,c4'是变基操作将c4重新在目标分支上应用而产生的新提交。再次将远程分支合并过后,其实c6与c4'这两个提交内容是完全一样的,等于是你将相同的内容又合并了一次。本地仓库的提交历史就像下图一样
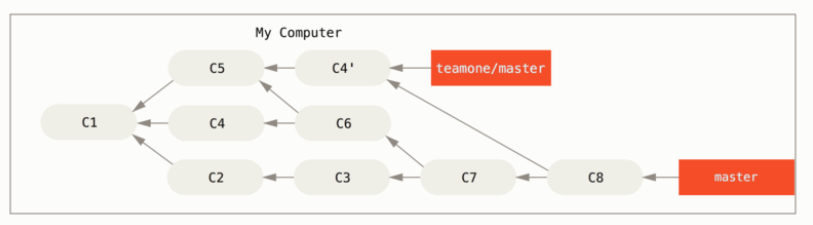
c8是由合并而产生的新提交,你的本地仓库中会同时存在c4与c4'这两个提交,它们两个理应不应该同时出现,这时查看提交历史,你会发现c4与c4'的提交信息完全一模一样。更大的问题是,假如你想要把你的修改提交到远程仓库上,等于就是你把别人通过变基操作丢弃掉的提交(c4,c6)又找了回来。
面对这种问题,你应该将远程分支作为目标分支进行变基,就是执行如下命令
$ git rebase rebase teamone/master
或者
$ git pull --rebase
Git 将会进行如下操作:
- 检查哪些提交是我们的分支上独有的(C2,C3,C4,C6,C7)
- 检查其中哪些提交不是合并操作的结果(C2,C3,C4)
- 检查哪些提交在对方覆盖更新时并没有被纳入目标分支(只有 C2 和 C3,因为 C4 其实就是 C4')
- 把查到的这些提交应用在
teamone/master上面
最终就会如下图所示,是一个线性的提交历史。
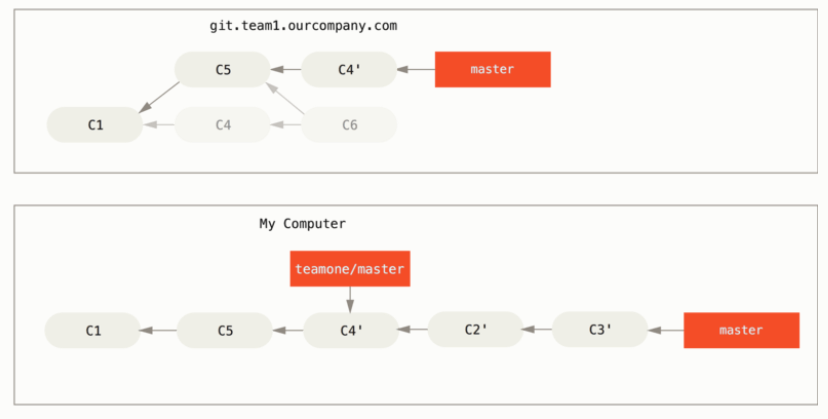
导致这种情况的原因就在于,你已经基于远程仓库的提交进行新的开发了,而对方却使用变基使得提交废弃了。建议使用变基时,最好只在你本地进行,并且只对没有推送到远程仓库的提交进行变基,这样才能安全的享受到变基带来的好处,否则的话你就有大麻烦了。